Set Log Permissions
Setting the log file folder to full permissions for all users.
Important: If you are using Windows XP Home Edition, you will need to boot into safe mode to perform this update.
Note: These screenshots are based on Windows 10. Windows XP through Windows 8.1 share similar screens.
Step 1
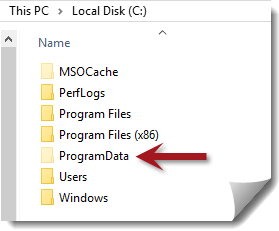
Using Windows File Explorer, navigate to the default log storage folder for SentryPC. WIndows XP uses c:\documents and settings\all users\application data\ amd Windows Vista, 7, 8, 8.1 and Windows 10 uses c:\programdata\.
Step 2
Right click this folder and click Sharing and Security on Windows 7 or Windows 8. Otherwise, click Properties (Windows 10 included).
Step 3
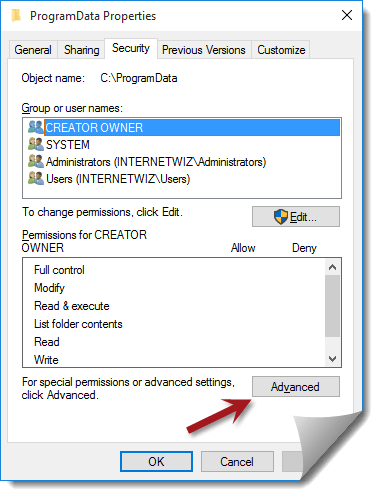
Click on the Security tab which will display the following screen:
Step 4
In the above screenshot, click the Advanced button highlighted by the red arrow.
Step 5

All rows on this screen will need to be changed. Starting with the first option, click SYSTEM or Administrators and then click Edit.
Note: On Windows 10, you will need to first click Change permissions which will then allow you to click the SYSTEM row and click the Edit button.
Step 6
On Windows XP - Windows 8.1, simply make sure everything is checked.
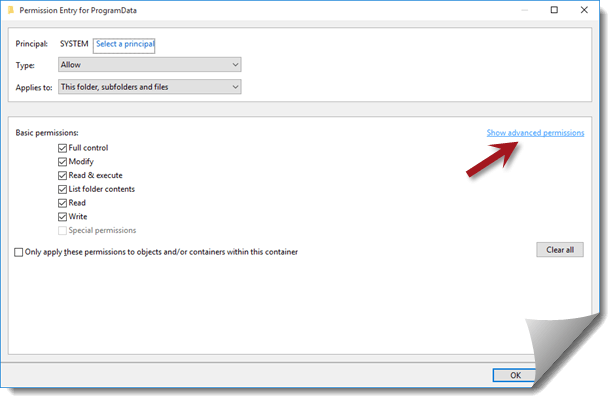
On Windows 10, click Show advanced permissions first then make sure everything is checked.
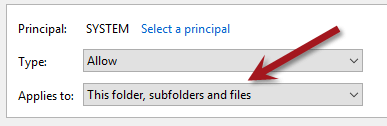
Once everything is checked or allowed, make sure the Applies To or Apply Onto section includes This folder, subfolders and files.
Click OK.
Step 7
Go back to Step 5 and do the same thing for all of the other permission rows / entries.
When finished, click OK on all open windows to save any changes made.
Finished!
Now your log folder will have full permissions for all users on your computer.
Support Center
Is your question not answered here? Not a problem! Simply use the contact link below to ask us your question(s).